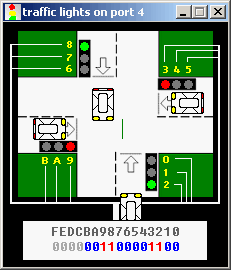
The traffic lights are controlled by sending data to i/o port 4.
There are 12 lamps: 4 green, 4 yellow, and 4 red.
You can set the state of each lamp by setting its bit:
1 - the lamp is turned on.
0 - the lamp is turned off.
Only 12 low bits of a word are used (0 to 11), last bits (12 to 15) are unused.
For example:
MOV AX, 0000001011110100b
OUT 4, AX

We use yellow hexadecimal digits in caption (to achieve compact view), here's a conversion:
Hex - Decimal

A   -   10
B   -   11
C   -   12    (unused)
D   -   13    (unused)
E   -   14    (unused)
F   -   15    (unused)
First operand for OUT instruction is a port number (4), second operand is a word (AX) that is written to the port. First operand must be an immediate byte value (0..255) or DX register. Second operand must be AX or AL only.
See also traffic_lights.asm in c:\emu8086\examples.
If required you can read the data from port using IN instruction, for example:
IN AX, 4
First operand of IN instruction (AX) receives the value from port, Second operand (4) is a port number. First operand must be AX or AL only. Second operand must be an immediate byte value (0..255) or DX register.
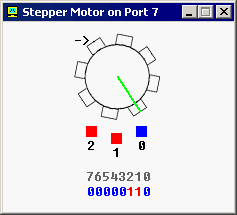
The stepper motor is controlled by sending data to I/O port 7.
Stepper motor is electric motor that can be precisely controlled by signals from a computer.
The motor turns through a precise angle each time it receives a signal.
By varying the rate at which signal pulses are produced, the motor can be run at different speeds or turned through an exact angle and then stopped.
This is a basic 3-phase stepper motor, it has 3 magnets controlled by bits 0, 1 and 2. other bits (3..7) are unused.
When magnet is working it becomes red. The arrow in the left upper corner shows the direction of the last motor move. Green line is here just to see that it is really rotating.

For example, the code below will do three clock-wise half-steps:
MOV AL, 001b ; initialize.
OUT 7, AL
MOV AL, 011b ; half step 1.
OUT 7, AL
MOV AL, 010b ; half step 2.
OUT 7, AL
MOV AL, 110b ; half step 3.
OUT 7, AL
If you ever played with magnets you will understand how it works. try experimenting, or see stepper_motor.asm in c:\emu8086\examples.
If required you can read the data from port using IN instruction, for example:
IN AL, 7
Stepper motor sets topmost bit of byte value in port 7 when it's ready.

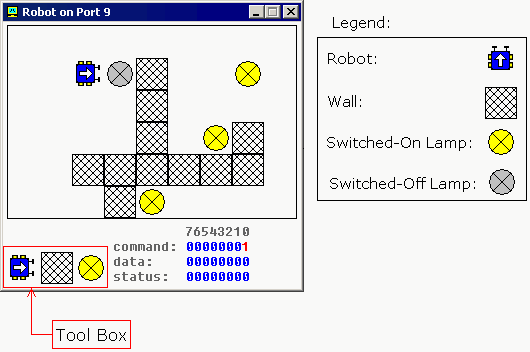
The robot is controlled by sending data to i/o port 9.
The first byte (port 9) is a command register. Set values to this port to make robot do something. supported values:
| decimal value | binary value | action |
| 0 | 00000000 | do nothing. | 1 | 00000001 | move forward. |
| 2 | 00000010 | turn left. |
| 3 | 00000011 | turn right. |
| 4 | 00000100 | examine. examines an object in front using sensor. when robot completes the task, result is set to data register and bit #0 of status register is set to 1. |
| 5 | 00000101 | switch on a lamp. |
| 6 | 00000110 | switch off a lamp. |
The second byte (port 10) is a data register. This register is set after robot completes the examine command:
| decimal value | binary value | meaning |
| 255 | 11111111 | wall |
| 0 | 00000000 | nothing |
| 7 | 00000111 | switched-on lamp |
| 8 | 00001000 | switched-off lamp |
The third byte (port 11) is a status register. Read values from this port to determine the state of the robot. Each bit has a specific property:
| description | |
| bit #0 | zero when there is no new data in data register, one when there is new data in data register. |
| bit #1 | zero when robot is ready for next command, one when robot is busy doing some task. |
| bit #2 | zero when there is no error on last command execution, one when there is an error on command execution (when robot cannot complete the task: move, turn, examine, switch on/off lamp). |
example:
MOV AL, 1  ; move forward.
OUT 9, AL  ;

MOV AL, 3  ; turn right.
OUT 9, AL  ;

MOV AL, 1  ; move forward.
OUT 9, AL  ;

MOV AL, 2  ; turn left.
OUT 9, AL  ;

MOV AL, 1  ; move forward.
OUT 9, AL  ;
Keep in mind that robot is a mechanical creature and it takes some time for it to complete a task. You should always check bit#1 of status register before sending data to port 9, otherwise the robot will reject your command and "busy!" will be shown. See robot.asm in c:\emu8086\examples.
Creating Custom Robo-World Map
It is possible to change the default map for the robot using the tool box.
If you click the robot button and place robot over existing robot it will turn 90 degrees counter-clock-wise. To manually move the robot just place it anywhere else on the map.
If you click lamp button and click switched-on lamp the lamp will be switched-off, if lamp is already switched-off it will be deleted. Click over empty space will create a new switched-on lamp.
Placing wall over existing wall deletes the wall.
Current version is limited to a single robot only. If you forget to place a robot on the map it will be placed in some random coordinates.
When robot device is closed the map is automatically saved inside this file:
It is possible to have several maps by renaming and coping this file before starting the robot device.
The right-click over the map brings up a popup menu that allows to switch-on or switch-off all the lamps at once.